


How to Hang Curtains
Creases will fall out of most curtains over time but they can be pressed out before hanging. It is always best to read any instructions before using an iron as some materials don’t react well to heat. Ironing from the back of the curtains (the lining) is advisable if unsure.
Pencil Pleat Curtains
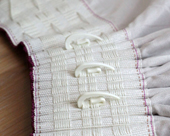
Knot the end of your heading tape. The heading tape at the top of the curtains should have 3 rows of string running through it. These all need knotting together at either side of each curtain so that when pulled they don’t just pull through. Gently pull the strings through and tie a knot in all 3 strings together.
Knowing how far to gather. Take the length of the track or pole (excluding the finials) that the curtains are going on to and add 6 inches (15cm). Half this number and that is the measurement to pull the curtains to. For example, if your track or pole is 72 inches (180cm) add 6 inches (15cm) to get 78 inches (195cm) than half it to 39 inches (97.5cm). This will hopefully ensure that the curtains meet nicely and overlap without being either too gathered and short on the pole/track, or not gathered enough and bulky on the pole/track.
Pull the strings. Take hold of all 3 strings once they have been knotted and try to pull evenly. Pull until the curtains are 3 inches (7.5cm) longer than half the width of your track or pole. Check the curtains against the window before tying off the strings. It is advisable to use a slipknot at this point. This will allow the curtains to be adjusted if they were to be cleaned.
Hooks can be placed on any of the three pockets on the heading tape depending on how long the curtains need to be when hung. The 3 pockets allow the curtains to be adjusted between 1-3 inches (3-8cm). Hooks should be placed every 4-6 pockets approximately. It is important to make sure that the hooks are evenly spaced along the heading tape.
Hanging curtains to look right is pretty straight forward but may require a little help. When the curtains are hooked up place a hand behind the curtains and in between each hook push forward (away from the window) with one hand and hold the pleats created with the other (help may be required for this especially if the curtains are thick or heavy). Continue this all the way along and tie the pleats loosely with a piece of fabric either around the middle or at the top and the bottom overnight. This will allow the curtains to remember their pleating.
Pinch Pleat Curtains
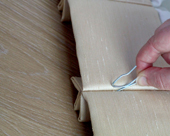
Pinch pleat curtains will come with drapery hooks provided (see below). It is important to make sure there are as many drapery hooks as rings on the pole or gliders on a track. In the case of a curtain pole it is advisable to have a ring between the outer bracket and the end finial to allow the curtains to hang correctly.
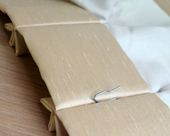
Place the curtains on a flat, clean and dry surface with the lining side facing upwards. Consider where the hooks need to be placed (this can be adjusted), then starting at the edge of the curtain, insert the needle end of the drapery hook (point upwards) in to the lining of the flat buckram heading being careful not to push the hook through the lining to the face side of the curtain. Work across the curtains placing a drapery hook in to each folded pleat. Only the hook should be visible once the drapery hook has been pushed in.
After inserting a few hooks it can be worth holding the curtain to the track or pole to check that the hooks have been positioned correctly. Pinch pleat curtains should hang under a pole and in front of a track.
Hooks can be added in between the folded pleats if necessary to support heavier curtains.
Where would you like to go now?


